There are standard buttons that are often added to a view that perform the basic functions (new, delete, refresh) that usually you put in a view.
The code in this post is a Custom Control you can add to a XPage bound to a lotus view to insert the buttons New, Delete and Refresh.
This is also an example about how to pass values from a XPage to a Custom Control using the Custom Properties and the object compositeData.
- create a Custom Control
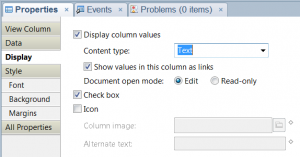
<?xml version="1.0" encoding="UTF-8"?> <xp:view xmlns:xp="http://www.ibm.com/xsp/core" xmlns:xp_1="http://www.ibm.com/xsp/coreex"> <xp:button value="New" id="btnCreate"> <xp:eventHandler event="onclick" submit="true" refreshMode="complete" immediate="false" save="false"> <xp:this.action> <xp:actionGroup> <xp:openPage target="newDocument" name="#{javascript:compositeData.pageName + '.xsp'}"> </xp:openPage> </xp:actionGroup> </xp:this.action> </xp:eventHandler> </xp:button> <xp:button value="Delete" id="btnDelete"> <xp:eventHandler event="onclick" submit="true" refreshMode="complete"> <xp:this.action> <xp:actionGroup> <xp:deleteSelectedDocuments view="#{javascript:compositeData.viewName}" message="#{javascript:compositeData.deleteMessage}"> </xp:deleteSelectedDocuments> </xp:actionGroup> </xp:this.action> </xp:eventHandler> </xp:button> <xp:button value="Refresh" id="btnRefresh"> <xp:eventHandler event="onclick" submit="true" refreshMode="complete"> <xp:this.action> <xp:executeScript script="#{javascript:context.reloadPage()}"> </xp:executeScript> </xp:this.action> </xp:eventHandler> </xp:button> <xp:br></xp:br> </xp:view> - create a XPage with a View Control configured to a view of the database and in a view column under the label “Display” enable “Check box” and “Show values in this column as links”
“Check box” allows you to select the rows, needed to “Delete” button
“Show values in this column as links” allows you to open the document
the two checks can be enabled in two different columns

- add the Custom Control to the XPage
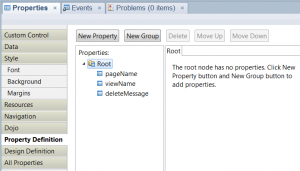
- select the Custom Control in the XPage and create the following properties:

Property Value deleteMessage enter a sentence to confirm the deletion
for example: “Do you want to delete the selected documents?”pageName enter the name of the XPage with which to create the document viewName enter the name of the View Control
the default value is viewPanel1
How it works:
In the Custom Control you define 3 properties as you see in figure:

These properties are used by the buttons through the object compositeData:
- the button “New” uses compositeData.pageName + ‘.xsp’ to get the XPage to open
- the button “Delete” uses compositeData.viewName to get the name of the View Control containing the selected documents to delete
- the button “Delete” uses compositeData.deleteMessage to get the message shown to the user to confirm the deletion
The use of these properties is necessary because I do not know in what context I’ll use this Custom Control.
The values of these properties are set in the XPage in which you inserted the Custom Control (see Section 4).

Leave a Reply